

How to set up a kid-friendly Windows 10 device with a child account
On Windows 10, you can set multiple accounts to share a laptop or desktop computer with other family members. If you accept children, they can also have a personal space in a more controlled environment to ensure they have the safest feel possible while browsing the net, using apps, and playing games.
It'due south all possible using the selection to create a child account on Windows 10, which you can and so manage in many ways through the "Family" settings in your Microsoft account. These tools allow yous to review reports of your children's online activities or limit the time they spend with their or shared devices. You tin can also restrict age and screen time for apps and games to ensure they don't end up loading sites that are not suited for them.
In this Windows 10 guide, we will walk you through the steps to ready a child account and manage its parental control settings.
- How to create a child business relationship on Windows 10
- How to manage a child business relationship on Windows 10
- How to fix mutual kid account issues on Windows 10
How to create a child business relationship on Windows 10
To create and set upwardly a child account on Windows 10, use these steps:
- Open Settings.
- Click on Accounts.
- Click on Family & other users.
-
Under the "Your family" section, click the Add a family member push button.
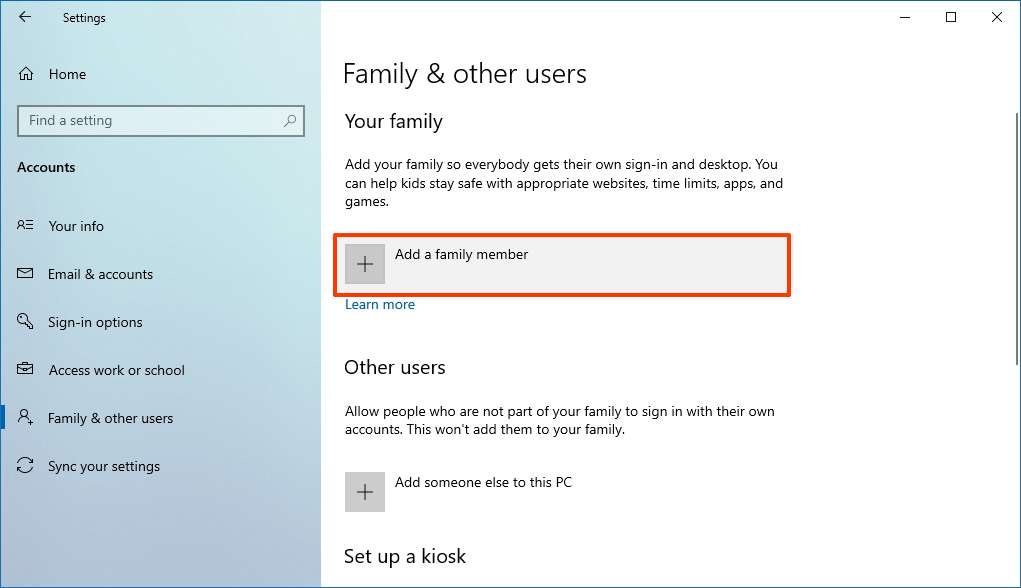 Source: Windows Central
 Quick note: If the young person already has an account, y'all can enter it in the email field to continue with the setup.
-
Click the Create one for a child option.
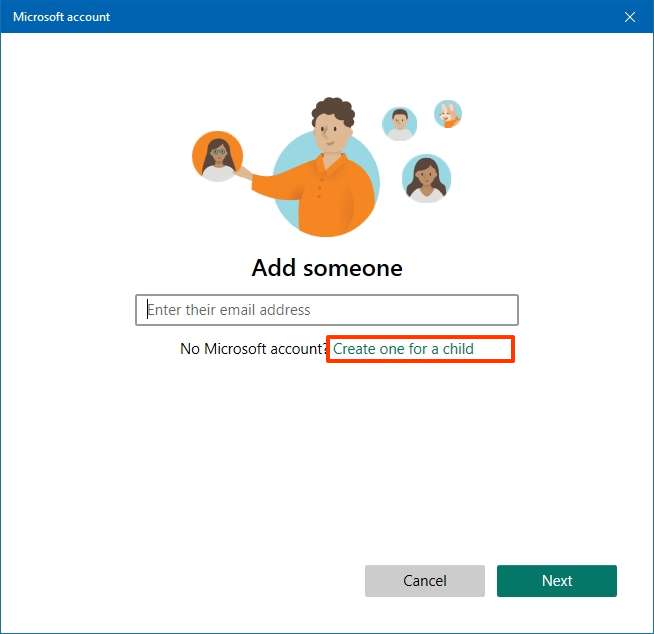 Source: Windows Central
 -
Confirm the email accost of the young person you lot want to add together.
 Source: Windows Central
 - Click the Next button.
- Create a new password for the child's account.
- Click the Next button.
-
Confirm the proper name of the person.
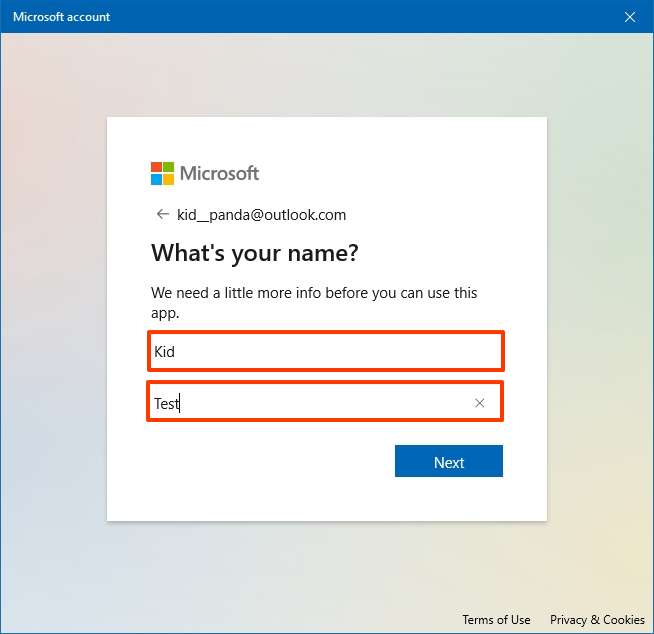 Source: Windows Central
 - Click the Next button.
-
Confirm the person's birthday.
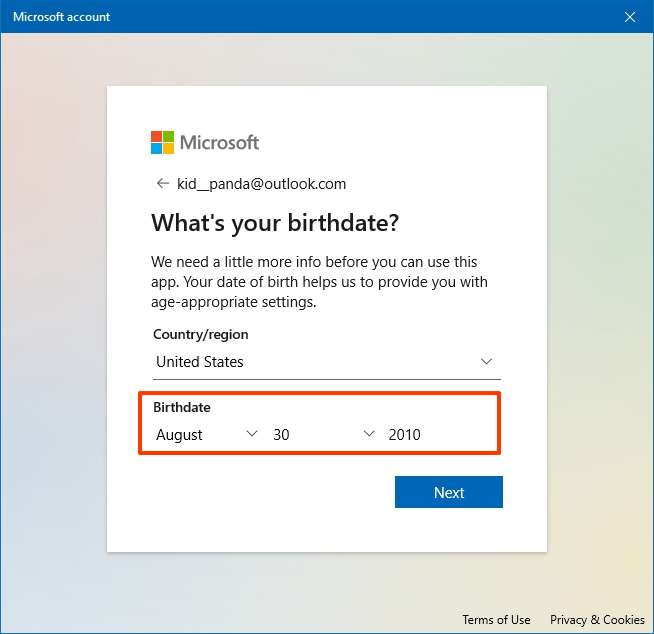 Source: Windows Central
 - Click the Next button.
-
Confirm the newly created email account.
 Source: Windows Central
 - Click the Next button.
- Confirm the password.
- Click the Sign in push.
-
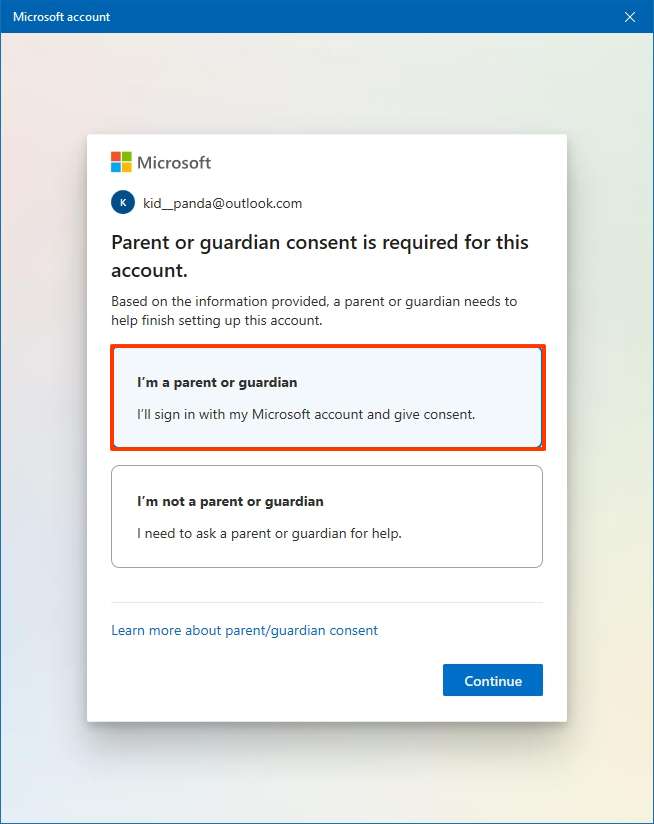
Confirm the parent or guardian'south consent.
 Source: Windows Central
 - Click the Proceed push.
-
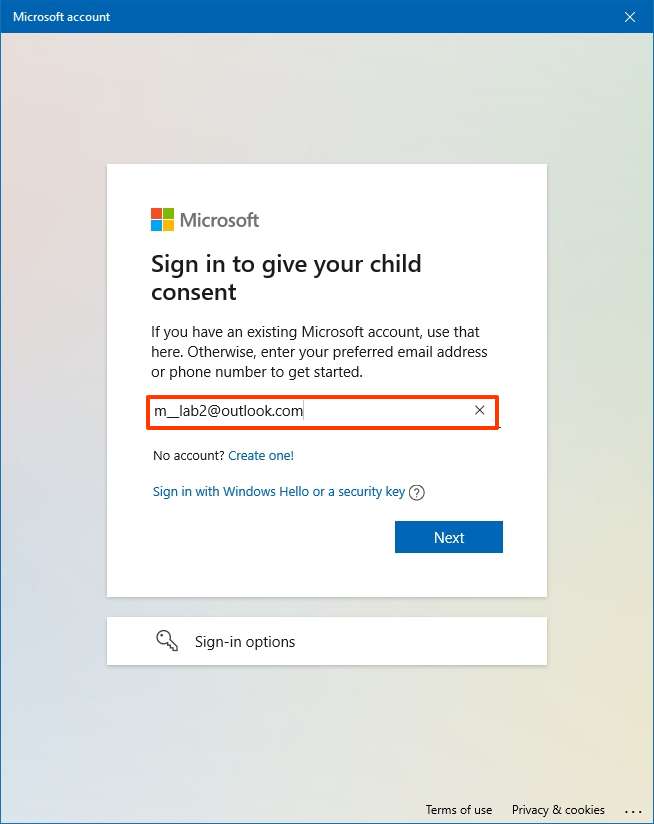
Confirm your parent or guardian email account.
 Source: Windows Cardinal
 - Click the Next push button.
-
Sign Microsoft'southward consent form by typing your name as shown in the form.
 Source: Windows Central
 - Click the Yep, I agree push.
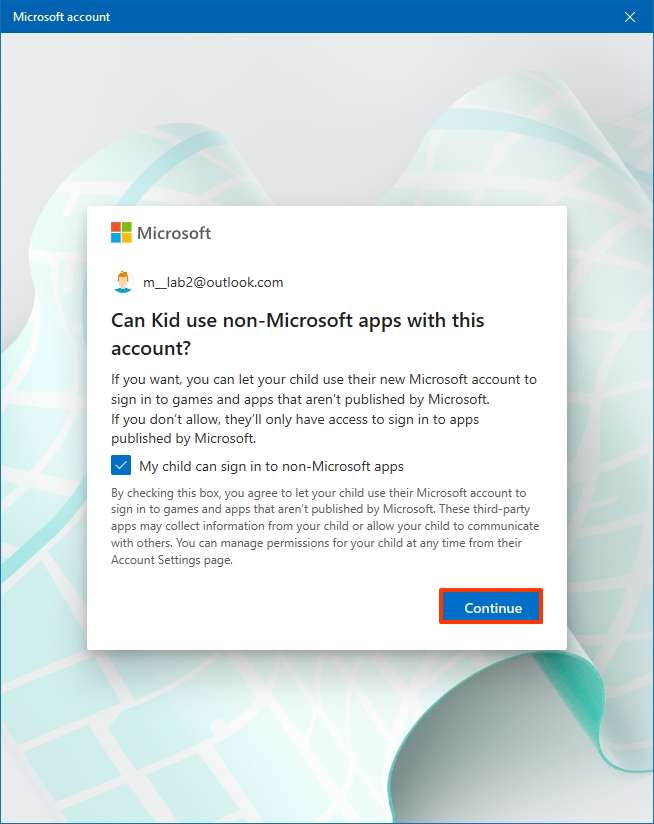
- (Optional) Clear the My child tin can sign in to not-Microsoft apps option.
-
Click the Keep button.
 Source: Windows Central
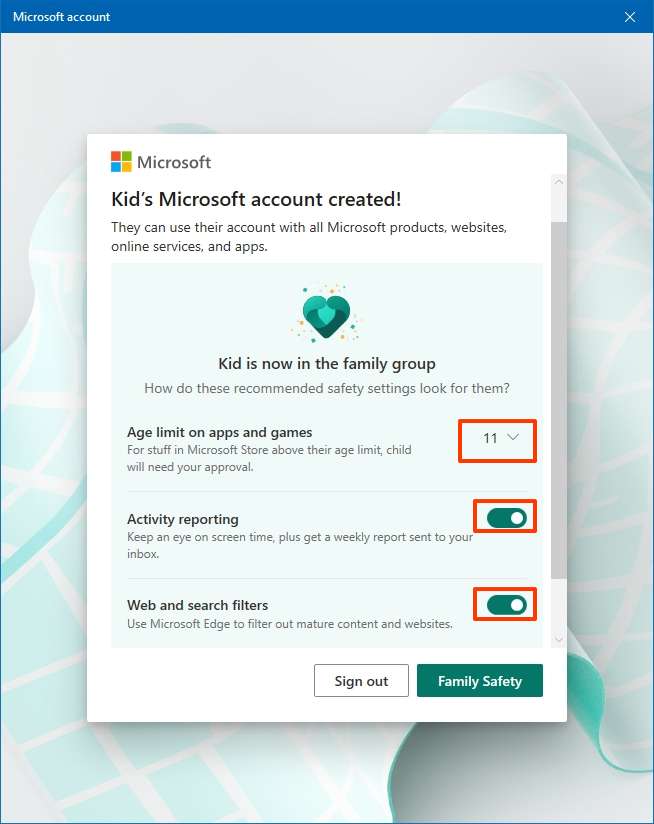
 - (Optional) Ostend the age limit for apps and games.
- Plow on the Action reporting toggle switch.
-
Plow on the Spider web and search filters toggle switch.
 Source: Windows Central
 - Click the Sign out button.


Once you complete the steps, a standard business relationship with limited access will be created for the kid, and the new member will be able to sign in immediately.
Signing in the first time
To consummate the setup of a child account, utilise these steps:
- Sign out of your account.
- Click the new business relationship (it'll initially show equally an email address).
- Click the Sign in choice.
- Confirm the account password.
-
Click the Sign in button.
 Source: Windows Key
 - Click the Next button.
-
Create a new Pin.
 Source: Windows Primal
 - Click the OK button.
-
Click the Only salve files to this PC selection. (Unless you want your kid's information to become backed up in OneDrive.)
 Source: Windows Key
 -
Choose the privacy settings for the new Windows 10 account by turning on or off the toggle switch for each selection.
 Source: Windows Central
 - Click the Take button.


After you lot complete the steps, the side by side time your kid signs in, the account volition appear equally the user's name, and they can sign in straight to the desktop.
How to manage a child account on Windows 10
Once the business relationship has been prepare, you tin can use the "Family" setting in your Microsoft business relationship online to view action reports and limit screen time for apps and games. You tin can enforce ratings for content, apps, and games and add money to allow the young person to make small purchases in the Microsoft Store.
To manage an account for a family fellow member, utilise these steps:
- Open up Settings.
- Click on Accounts.
- Click on Family & other people.
-
Under "Your family," click the Manage family settings online choice.
 Source: Windows Key

Alternatively, you tin sign into your Microsoft account in your web browser and open the Family tab.
While in the family unit dashboard, you can view action reports and manage various aspects of the account, such as screen time for the entire device and apps and games, cake inappropriate websites, and much more than.
View recent activities
The activeness reports let you to view the user'southward recent spider web and searches, spendings, apps and games, Xbox online gaming, and screen time of a user.
To enable and view the family member recent activities, use these steps:
-
Under the child's business relationship, click the Overview option.
 Source: Windows Fundamental
 - Click on Overview from the left navigation pane.
-
Turn on the Activity reporting toggle switch at the lesser of the pane to offset collecting activities from their Windows ten devices (if applicable).
 Source: Windows Central
 - (Optional) Plow on the Email weekly reports to me toggle switch to go a total report delivered to your email account.
-
Under the business relationship's name, click the action menu to select the day of activities you desire to review the activities.
 Source: Windows Central


Once the option is enabled, y'all can run across the websites they've been visiting, the apps and games they have been downloading and playing, and the time they've spent on their devices.
Limit screen fourth dimension
The screen time limit is a feature that lets y'all specify how much time someone can spend on the estimator and a during what periods of the day.
To limit the time a family member spends on the computer, use these steps:
- Under the kid'south account, click the Overview choice.
- Click on Screen time from the left navigation pane.
- Click the Devices tab.
-
Turn on the Use ane schedule on all devices toggle switch.
 Source: Windows Key
 Quick tip: Information technology's too possible to enable screen time per device type (Windows 10 and Xbox devices).
- Click the day you desire to customize the screen time of.
- (Optional) Utilise the drop-down menu and select the Every solar day option to set the aforementioned settings for all the days of the week.
- Use the available slider to specify the hours the family fellow member tin use the figurer.
-
Apply the schedule settings to specify during what fourth dimension they can apply screen time.
 Source: Windows Fundamental
 - (Optional) Click the Add a schedule option to specify a second time range to go on accessing the device.
- Click the Done button.


After you complete the steps, your children will just be able to apply their devices during the time you specify.
Limit apps and games limits
The Family settings also include settings to enforce screen time limits for apps and games to promote a healthier and safer lifestyle for young members.
To add limits for app and game, use the steps:
- Under the child's account, click the Overview pick.
- Click on Screen time from the left navigation pane.
- Click the Apps and games tab.
-
Turn on the App and game limits toggle switch (if applicative).
 Source: Windows Central
 - Select the app or game.
-
Click the Set a limit button.
 Source: Windows Central
 Quick tip: Yous tin likewise utilise the Cake app push button to restrict access to the application when the user is logged in.
-
Cull which days to set limits on the specific awarding. Options include:
- Every twenty-four hour period
- Weekdays
- Weekends
- Apply the bachelor slider to specify the hours the family fellow member can utilize the app.
-
Use the schedule settings to specify during what fourth dimension they tin use screen fourth dimension.
 Source: Windows Fundamental
 - Click the Washed push.


Once you complete the steps, the app volition but exist available during the specified hours. Outside the limits, the user won't exist able to launch the application.
Employ content restrictions
The Content filters tab includes the settings to set an age limit to restrict inappropriate apps and games. Too, y'all can enable web filtering to block websites and search results that are known to be not suited for young people. In addition, you lot can restrict or specify the set of sites your child can access.
Set age restriction
To specify an age restriction, use these steps:
- Under the kid'southward business relationship, click the Overview choice.
- Click on Content filtering from the left navigation pane.
- Click the Apps and games tab.
-
Employ the Apps and games rated upwards to age driblet-down menu to specify the historic period restriction (for example, 18).
 Source: Windows Primal
 - (Optional) Under the "Blocked apps" department, click the Remove option to let the app above their age rating.

If you desire to cake an app, you can do this from the "Apps and games limits" tab, selecting the app and clicking the Cake app button.
If yous want to allow the app, confirm "yes" when they endeavor to launch the app and ask.
Set web filtering
To control which websites a family member tin can access, use these steps:
- Under the kid's business relationship, click the Overview pick.
- Click on Content filtering from the left navigation pane.
- Click the Web and search tab.
-
Under the "Filter settings" section, turn of the Filter inappropriate websites and searches toggle switch.
 Source: Windows Central
 - (Optional) Turn on the Only utilise allowed websites toggle switch if yous desire to cake every website except those y'all specify as allowed manually.
- Under the "Always allowed" section, specify the website you want to allow.
- Click the + push button to add it to the list.
- Repeat footstep No. 8 to add more sites.
-
Under the "Blocked sites" section, specify the website y'all desire to deny.
 Source: Windows Central
 - Click the + button to add it to the list.
- Repeat stride No. eleven to add more than sites.


It's worth noting that if you want to apply web filtering, inappropriate searches volition be more effective using Microsoft Edge and Bing equally the default search engine.
If you want to restrict your child from using some other search engine, which may not have safe search enabled, information technology is a good idea to add those sites to the blocked list, including Google, Yahoo, DuckDuckGo, and others.
Too, this feature but works with Microsoft Border. As a effect enabling "Web browsing" volition cake other browsers, such as Chrome or Firefox, to help to go along your kids safer when surfing the net. However, if you desire to allow the use of some other browser, you can unblock them from the Apps and games section under "Blocked apps."
Adding money to the business relationship
The Spending tab allows you to add money to your child'southward Microsoft account to purchase anything they want without breaking the bank.
This feature works in combination with the Content restrictions settings to block the products they shouldn't buy, such as games rated for a much older audition.
Ask to buy
To configure approval requests for purchase stuff from the Microsoft Shop, employ these steps:
- Nether the kid's account, click the Overview option.
- Click on Spending from the left navigation pane.
-
Plow on the Needs organizer blessing to buy things toggle switch to allow you lot to corroborate whatsoever purchase in the Microsoft Store without the need to add together funds.
 Source: Windows Central
 - Turn on the E-mail me when they buy stuff toggle switch to keep rail of purchases.

One time you consummate the steps, they volition require authorization to purchase apps, games, and entertainment in the Microsoft Store without adding funds.
Calculation funds
To add together money they can spend in the Microsoft Shop without permission, utilize these steps:
- Under the kid'south business relationship, click the Overview option.
- Click on Spending from the left navigation pane.
-
Under the Microsoft business relationship residuum section, click the Add money push.
 Source: Windows Fundamental
 -
Specify the corporeality of money to add.
 Source: Windows Central
 - Continue with the on-screen directions to complete the transaction.


This procedure is non refundable. If you are unsure how it will piece of work, start with a small amount, or use the "Enquire to buy" option. In addition to adding money, yous can as well view your child's purchase history at the lesser of the family unit settings pane.
How to gear up common child account issues on Windows 10
The settings should apply immediately after setting upwards a kid account on Windows x and configuring the parental controls. Withal, sometimes, you may come across some problems getting screen fourth dimension and family activities working correctly.
To avoid or to go around common problems, make use to retrieve these tips:
As soon as the child account has been created, yous want to verify the account on Windows 10 on Settings > Accounts > Your info. Click the Verify link and follow the on-screen instructions to complete the process.
If the settings are not working, connect the device to the net, and restart the computer to update the organisation settings.
Sometimes, problems can too occur as a upshot of missing updates. If this is the instance, make sure to check for new updates manually on Settings > Update & Security > Windows Update, and click the Bank check for updates button.
We're focusing this guide on Windows 10, just using the Microsoft family unit settings, you can as well manage other compatible devices, such equally Xbox One and Android phones, including boosted features similar "Find your Child," and more.
More Windows resource
For more helpful articles, coverage, and answers to common questions nigh Windows x and Windows xi, visit the following resource:
- Windows 10 on Windows Central — All yous need to know
- Windows ten help, tips, and tricks
- Windows eleven on Windows Fundamental — All you need to know
- Windows xi help, tips, and tricks
We may earn a commission for purchases using our links. Acquire more.

Oh Dear
New written report reveals Microsoft's future AR strategy; HoloLens 3 is expressionless
Business Insider has today published a follow-upward written report with more details about Microsoft's canceled HoloLens three augmented reality headset. The partnership with Samsung is said to include a headset with a set of screens inside, powered by a Samsung phone in your pocket.

Keeping it affordable
Review: Surface Laptop SE is the new standard for Grand-8 Windows PCs
Starting at merely $250, Microsoft'southward first foray into affordable laptops for the education market is a winner. With a gorgeous pattern, excellent thermals, and a fantastic typing experience, Microsoft would practice right to sell this directly to consumers as well. Let'south simply hope Intel can make a better CPU.

Source: https://www.windowscentral.com/how-set-kid-friendly-windows-10-pc-child-account
Posted by: rogersocke2001.blogspot.com
0 Response to "How to set up a kid-friendly Windows 10 device with a child account"
Post a Comment